案例13:parted模块新建扩展分区ansible node1 -m parted -a 'device=/dev/sda number=4 part_type=extended part_start=46GiB part_end=49.8GiB state=present'
新建逻辑分区ansible node1 -m parted -a 'device=/dev/sda number=5 part_type=logical part_start=46.1GiB part_end=48.2GiB state=present'
案例14:filesystem—文件系统ansible node1 -m filesystem -a 'fstype=xfs dev=/dev/sda5'
案例15:mount---挂载新建挂载点/commonansible node1 -m file -a 'path=/common state=directory'
查看/dev/sda5的UUIDansible node1 -m shell -a 'blkid /dev/sda5'
将分区/dev/sda5挂载到/common目录ansible node1 -m mount -a 'path=/common src=https://www.huyubaike.com/biancheng/"UUID=d162b8b9-2326-4ee4-a559-80861461c4f0" fstype=xfs state=mounted'
卸载ansible node1 -m mount -a 'path=/common src=https://www.huyubaike.com/biancheng/"UUID=d162b8b9-2326-4ee4-a559-80861461c4f0" fstype=xfs state=absent'
案例16:lvg—新建卷组ansible node1 -m lvg -a 'vg=vg0 pesize=16M pvs=/dev/sda5'
案例17:lvol—新建逻辑卷ansible node1 -m lvol -a 'lv=lv0 size=1000M vg=vg0'在线扩容逻辑卷ansible node1 -m lvol -a 'lv=lv0 size=1600M vg=vg0 resizefs=yes'
案例18:sefcontext---修改context值ansible node1 -m file -a 'path=/share state=directory'修改context值ansible node1 -m sefcontext -a 'target="/share(/.*)?" setype=samba_share_t state=present'应用新的selinux 文件的context值ansible node1 -m command -a 'restorecon -irv /share'
案例19:debug用户输出自定义的信息,类似于echo、print等输出命令 。ansible中的debug主要用于输出变量值、表达式值,以及用于when条件判断时 。使用方式非常简单

文章插图
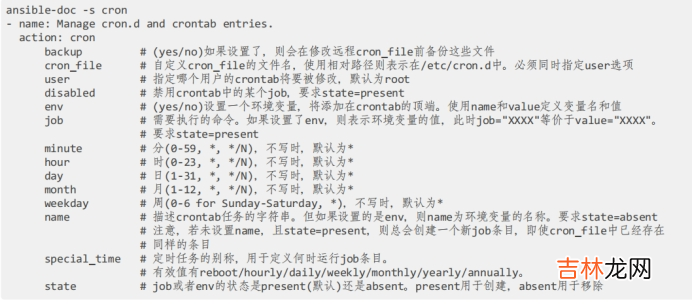
案例20:cron---计划任务模块
文章插图
ansible node1 -m cron -a 'name="shuchu" job="/bin/echo I AM RHCE" user=root minute=0 hour=14 state=present'
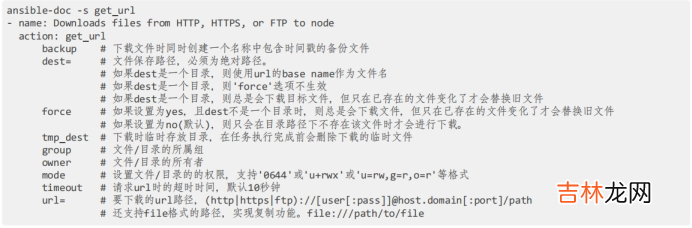
案例21:get_url【ansible使用临时命令通过模块来执行任务】
文章插图
语法:ansible node1 -m get_url -a 'url=需要下载的文件 dest=存放的位置'
部署web服务器[root@ansible ~]# su - studentLast login: Fri Oct 21 11:08:53 CST 2022 on pts/0[student@ansible ~]$ cd ansible/下载本地仓库
[student@ansible ansible]$ ansible node1 -m yum_repository -a 'file=server name=baseos description=centos8 baseurl=file:///mnt/BaseOS enabled=yes gpgcheck=no'node1 | CHANGED => { "ansible_facts": { "discovered_interpreter_python": "/usr/libexec/platform-python" }, "changed": true, "repo": "baseos", "state": "present"}[student@ansible ansible]$ ansible node1 -m yum_repository -a 'file=server name=appsteram description=centos8 baseurl=file:///mnt/AppStream enabled=yes gpgcheck=no'node1 | CHANGED => { "ansible_facts": { "discovered_interpreter_python": "/usr/libexec/platform-python" }, "changed": true, "repo": "appsteram", "state": "present"}
经验总结扩展阅读


- 这才是使用ps命令的正确姿势
- Ansible 批处理实战
- 小米手环6nfc使用体验_小米手环6nfc使用测评
- 如何正确使用容声冰箱 容声冰箱报价
- 秋天室内空调调制冷还是制热 秋天空调怎么使用好
- 空调秋天开什么模式好 秋季空调使用指南
- 秋天空调晚上一般开多少度为最适合 秋天空调使用指南
- CF中怎么改名(cf买了改名卡怎么使用)
- 使用LEFT JOIN 统计左右存在的数据
- ansible应用之安装elk框架