接下来,我们将更新 VirtualService,并指定将所有流量路由到子集 。在这种情况下,我们将把所有流量路由到原始版本original的前端 。
[root@k8scloude1 ~]# vim frontend-vs.yaml[root@k8scloude1 ~]# cat frontend-vs.yamlapiVersion: networking.istio.io/v1alpha3kind: VirtualServicemetadata:name: frontend-ingressspec:hosts:- '*'gateways:- frontend-gatewayhttp:- route:- destination:host: frontend.online-boutique.svc.cluster.localport:number: 80subset: original更新 VirtualService 资源
[root@k8scloude1 ~]# kubectl apply -f frontend-vs.yamlvirtualservice.networking.istio.io/frontend-ingress created[root@k8scloude1 ~]# kubectl get virtualserviceNAMEGATEWAYSHOSTSAGEfrontend["frontend.default.svc.cluster.local"]5d14hfrontend-ingress["frontend-gateway"]["*"]14s#修改frontend这个virtualservice的hosts为frontend.online-boutique.svc.cluster.local[root@k8scloude1 ~]# kubectl edit virtualservice frontendvirtualservice.networking.istio.io/frontend edited[root@k8scloude1 ~]# kubectl get virtualserviceNAMEGATEWAYSHOSTSAGEfrontend["frontend.online-boutique.svc.cluster.local"]5d14hfrontend-ingress["frontend-gateway"]["*"]3m24s现在我们将 VirtualService 配置为将所有进入的流量路由到 original 子集,我们可以安全地创建新的前端部署 。
[root@k8scloude1 ~]# vim frontend-v1.yaml[root@k8scloude1 ~]# cat frontend-v1.yamlapiVersion: apps/v1kind: Deploymentmetadata:name: frontend-v1spec:selector:matchLabels:app: frontendversion: 1.0.0template:metadata:labels:app: frontendversion: 1.0.0annotations:sidecar.istio.io/rewriteAppHTTPProbers: "true"spec:containers:- name: serverimage: gcr.lank8s.cn/tetratelabs/boutique-frontend:1.0.0ports:- containerPort: 8080readinessProbe:initialDelaySeconds: 10httpGet:path: "/_healthz"port: 8080httpHeaders:- name: "Cookie"value: "shop_session-id=x-readiness-probe"livenessProbe:initialDelaySeconds: 10httpGet:path: "/_healthz"port: 8080httpHeaders:- name: "Cookie"value: "shop_session-id=x-liveness-probe"env:- name: PORTvalue: "8080"- name: PRODUCT_CATALOG_SERVICE_ADDRvalue: "productcatalogservice:3550"- name: CURRENCY_SERVICE_ADDRvalue: "currencyservice:7000"- name: CART_SERVICE_ADDRvalue: "cartservice:7070"- name: RECOMMENDATION_SERVICE_ADDRvalue: "recommendationservice:8080"- name: SHIPPING_SERVICE_ADDRvalue: "shippingservice:50051"- name: CHECKOUT_SERVICE_ADDRvalue: "checkoutservice:5050"- name: AD_SERVICE_ADDRvalue: "adservice:9555"- name: ENV_PLATFORMvalue: "gcp"resources:requests:cpu: 100mmemory: 64Milimits:cpu: 200mmemory: 128Mi创建前端部署frontend-v1
[root@k8scloude1 ~]# kubectl apply -f frontend-v1.yamldeployment.apps/frontend-v1 created#deploy正常运行[root@k8scloude1 ~]# kubectl get deploy | grep frontend-v1frontend-v11/11154s#pod正常运行[root@k8scloude1 ~]# kubectl get pod | grep frontend-v1frontend-v1-6457cb648d-fgmkk2/2Running070s如果我们在浏览器中打开 INGRESS_HOST,我们仍然会看到原始版本的前端 。浏览器打开http://192.168.110.190/,显示的前端如下:
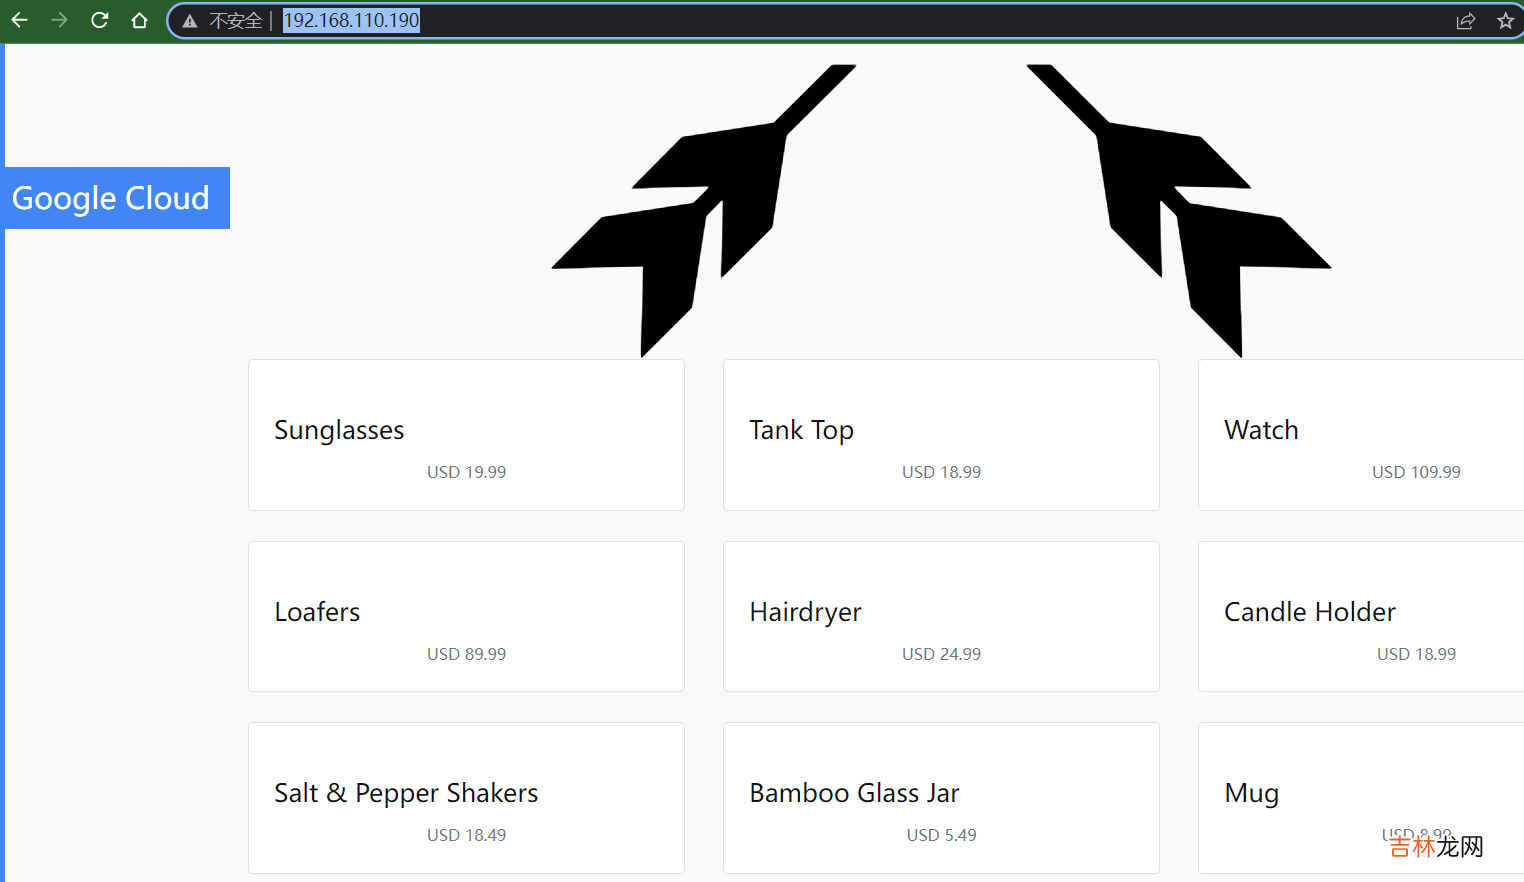
文章插图
让我们更新 VirtualService 中的权重,开始将 30% 的流量路由到 v1 的子集 。
[root@k8scloude1 ~]# vim frontend-30.yaml [root@k8scloude1 ~]# cat frontend-30.yamlapiVersion: networking.istio.io/v1alpha3kind: VirtualServicemetadata:name: frontend-ingressspec:hosts:- '*'gateways:- frontend-gatewayhttp:- route:- destination:host: frontend.online-boutique.svc.cluster.localport:number: 80subset: originalweight: 70- destination:host: frontend.online-boutique.svc.cluster.localport:number: 80subset: v1weight: 30更新 VirtualService[root@k8scloude1 ~]# kubectl apply -f frontend-30.yamlvirtualservice.networking.istio.io/frontend-ingress configured[root@k8scloude1 ~]# kubectl get virtualservicesNAMEGATEWAYSHOSTSAGEfrontend["frontend.online-boutique.svc.cluster.local"]5d14hfrontend-ingress["frontend-gateway"]["*"]20m
经验总结扩展阅读
-
-
-
-
-
-
-
-
-
-
-
-
-
-
-
-
-
-
-
-
- 九 前后端分离项目:实现"添加"功能(后端接口)
- 电视剧远大前程十三太保中的瞎子是谁?
- 2023年9月23日财神方位吉凶 九月二十三日财神方位
- 十一 Istio:向istio服务网格中引入虚拟机
- 四 SoringCloud -微信获取用户信息
- 2023年农历七月二十三可不可以结婚
- 2023年农历九月二十三是不是领证黄道吉日 今天领证顺利吗
- 九 Istio:istio安全之授权
- 快读《ASP.NET Core技术内幕与项目实战》WebApi3.1:WebApi最佳实践
- 下雨天迪士尼有哪些项目不能玩 下雨天迪士尼怎么玩