文章插图
创建普通服务并注册到服务查询中心——EurekaClient
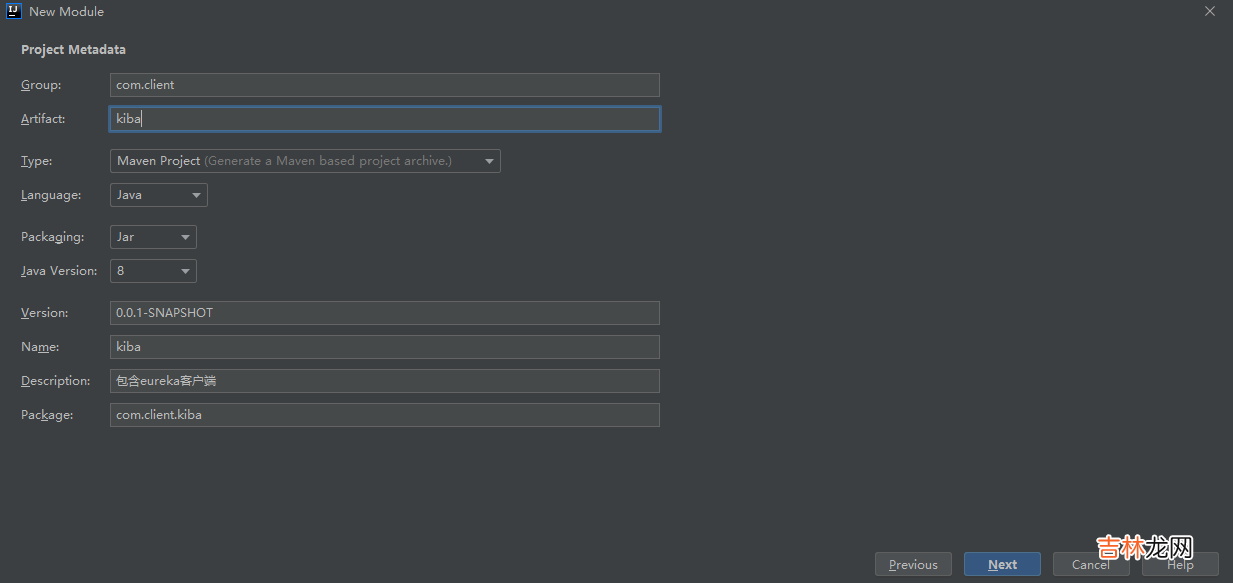
下面我们创建一个WebApi,一个使用了EurekaClient的WebApi,项目会通过EurekaClient 将当前项目注册到服务查询中心里,如下个图:

文章插图
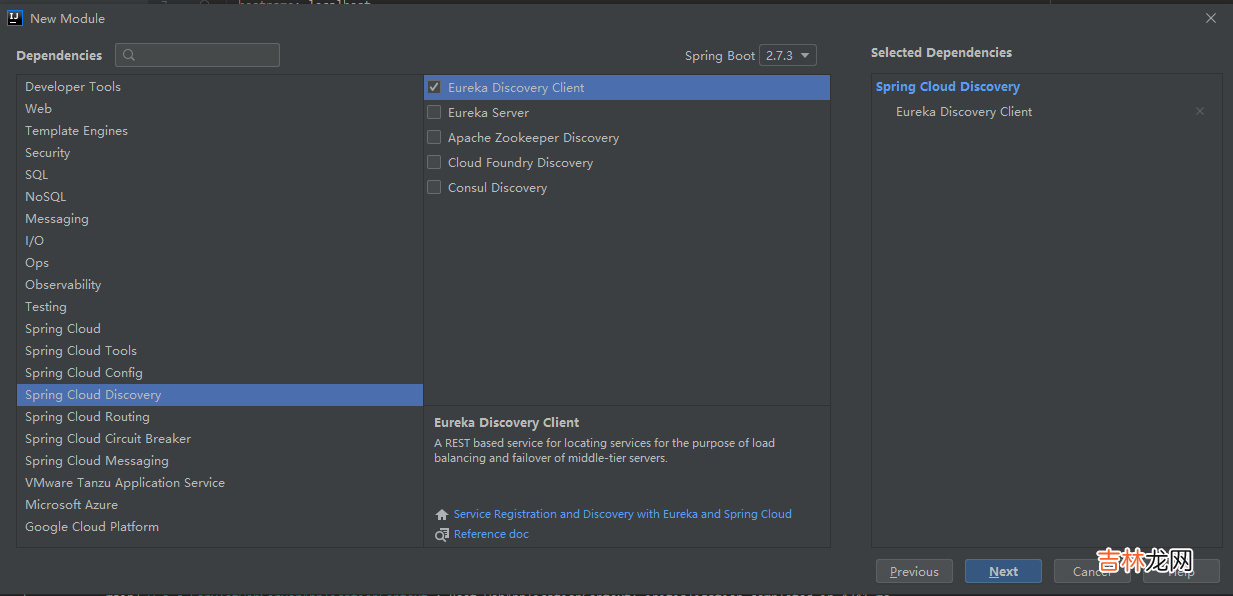
点击下一步,然后这次我们选择SpringCloudDiscovery—Eureka Discovery Client,如下图:

文章插图
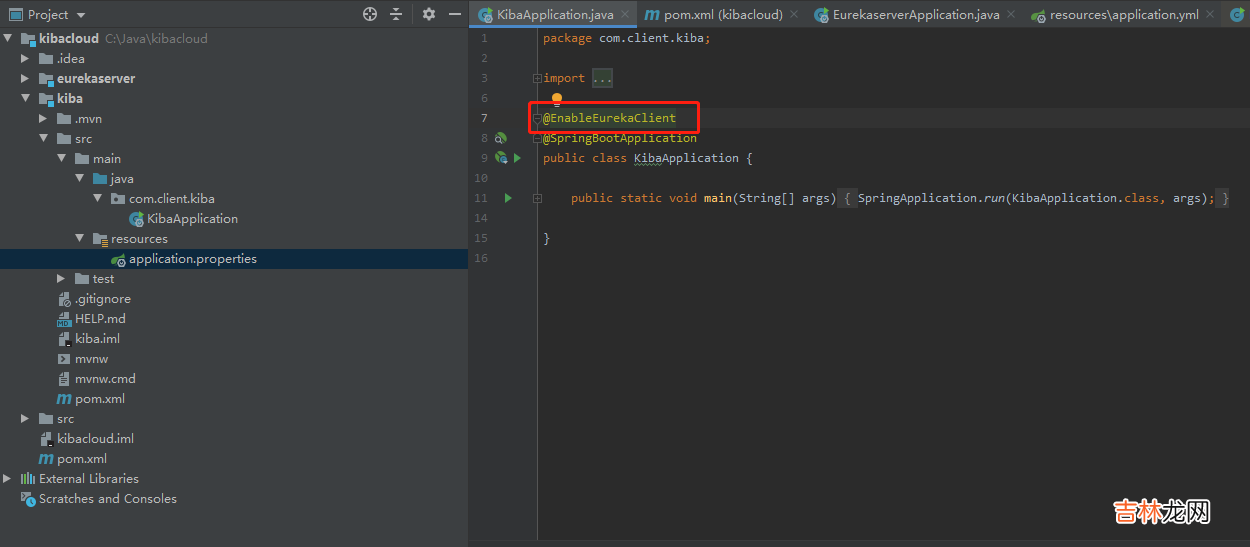
项目创建成功后,然后我们还是找到入口文件,为KibaApplication类加上@EnableEurekaClient注解,如下图:

文章插图
然后修改application.properties为application.yml,编写代码如下:
# 启动端口server:port: 5181?spring:application:name: eureka-kiba# eureka客户端配置,配置要注册的服务查询中心eureka:client:service-url:defaultZone: http://localhost:5180/eureka # 指定服务注册中心然后我们在pom.xml里添加spring-boot-starter-web的Jar包引用,代码如下:
<dependency><groupId>org.springframework.boot</groupId><artifactId>spring-boot-starter-web</artifactId></dependency>然后创建一个controller文件,再创建一个HelloWorld的java类,如下图:

文章插图
然后编辑HelloWorld类,代码如下:
package com.client.kiba.controller;?import org.springframework.web.bind.annotation.*;?@RequestMapping(value = "https://www.huyubaike.com/helloWorld")@RestControllerpublic class HelloWorld {@RequestMapping(value = "https://www.huyubaike.com/GetName", method = RequestMethod.GET)public String GetName(){return "我是Kiba518";}@RequestMapping(value = "https://www.huyubaike.com/GetAge", method = {RequestMethod.GET,RequestMethod.POST})public int GetAge(){return 518;}@PostMapping("/GetAge1")public int GetAge1(){return 518;}@GetMapping("/GetAge2")public int GetAge2(){return 518;}}然后启动项目,然后在打开我们的eureka服务查询中心——http://localhost:5180/,可以看到服务已经成功注册进了服务中心 。

文章插图
注意:这里需要单独启动一下我们刚刚建好的项目 。

文章插图
到此,eureka服务注册就介绍完了 。
不得不说,eureka把服务注册处理的如此简单,仅仅用配置就搞定了,实在非常优秀 。
使用eureka内注册的服务
创建一个新moudle,创建过程如上 。
修改Kiba3Application的代码如下:
package com.clinet.kiba3;?import org.springframework.boot.SpringApplication;import org.springframework.boot.autoconfigure.SpringBootApplication;import org.springframework.cloud.client.discovery.EnableDiscoveryClient;import org.springframework.cloud.client.loadbalancer.LoadBalanced;import org.springframework.context.annotation.Bean;import org.springframework.web.client.RestTemplate;?@SpringBootApplication@EnableDiscoveryClientpublic class Kiba3Application {?public static void main(String[] args) {SpringApplication.run(Kiba3Application.class, args);}@Bean@LoadBalancedRestTemplate restTemplate(){return new RestTemplate();}}然后创建RemoteController接口,代码如下:
package com.clinet.kiba3.controller;?import org.springframework.beans.factory.annotation.Autowired;import org.springframework.http.ResponseEntity;import org.springframework.web.bind.annotation.GetMapping;import org.springframework.web.bind.annotation.RequestMapping;import org.springframework.web.bind.annotation.RequestParam;import org.springframework.web.bind.annotation.RestController;import org.springframework.web.client.RestTemplate;?@RestController@RequestMapping("/Remote")public class RemoteController {@AutowiredRestTemplate restTemplate;?/*** http://localhost:5183/Remote/TestRestRequest* @return*/@GetMapping("/TestRestRequest")public ResponseEntity<String> TestRestRequest() {/*** 第一个参数:url——http://eureka-kiba2/helloWorld/GetName 这里把ip替换为在eureka中注册的名字* 第二个参数:返回值类型*/ResponseEntity<String> entity = restTemplate.getForEntity("http://eureka-kiba2/helloWorld/GetName", String.class);System.out.println("状态码:" + entity.getStatusCode());System.out.println("响应体" + entity.getBody());?return ResponseEntity.ok(entity.getBody());?}}
经验总结扩展阅读
- MC中如何做暗门
- 怎么用qq定位一个人的位置
- 平行志愿如何填报
- 什么是超参数
- 基于Netty的TCP服务框架
- 鸡蛋饼的热量
- 一个沃柑的热量大概是多少?
- 家里有一个蟑螂就会有一窝吗
- 酸奶过期了一个月有什么用
- 一个钵仔糕多少克


