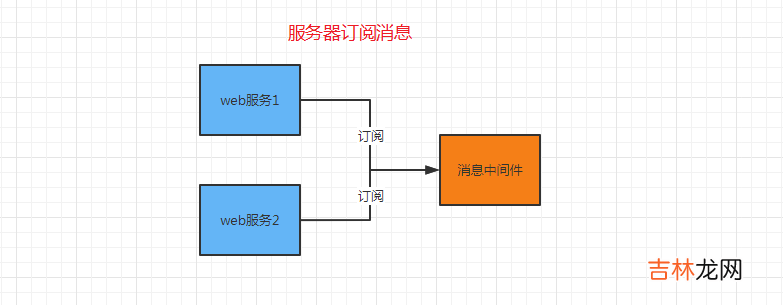
方案三:广播模式将消息的发送方和接收方都处于同一个服务器下才能发送消息,那么可以转换一下思路,可以将消息以消息广播的方式通知给所有的服务器,可以使用消息中间件发布订阅模式,消息脱离了服务器的限制,通过发送到中间件,再发送给订阅的服务器,类似广播一样,只要订阅了消息,都能接收到消息的通知:
文章插图
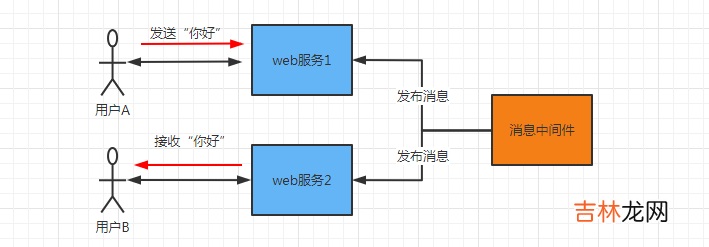
发布者发布消息到消息中间件,消息中间件再将发送给所有订阅者:
文章插图
广播模式的实现搭建单机 websocket参考以前写的websocket单机搭建 文章,先搭建单机
websocket实现消息的推送 。1. 添加依赖
<dependency><groupId>org.springframework.boot</groupId><artifactId>spring-boot-starter-freemarker</artifactId></dependency><dependency><groupId>org.springframework.boot</groupId><artifactId>spring-boot-starter-web</artifactId></dependency><dependency><groupId>org.springframework.boot</groupId><artifactId>spring-boot-starter-websocket</artifactId></dependency><dependency><groupId>org.springframework.boot</groupId><artifactId>spring-boot-starter-amqp</artifactId></dependency>2. 创建 ServerEndpointExporter 的 bean 实例ServerEndpointExporter 的 bean 实例自动注册 @ServerEndpoint 注解声明的 websocket endpoint,使用springboot自带tomcat启动需要该配置,使用独立 tomcat 则不需要该配置 。@Configurationpublic class WebSocketConfig {//tomcat启动无需该配置@Beanpublic ServerEndpointExporter serverEndpointExporter() {return new ServerEndpointExporter();}}3. 创建服务端点 ServerEndpoint 和 客户端端- 服务端点
@Component@ServerEndpoint(value = "https://www.huyubaike.com/message")@Slf4jpublic class WebSocket { private static Map<String, WebSocket> webSocketSet = new ConcurrentHashMap<>(); private Session session; @OnOpen public void onOpen(Session session) throws SocketException {this.session = session;webSocketSet.put(this.session.getId(),this);log.info("【websocket】有新的连接,总数:{}",webSocketSet.size()); } @OnClose public void onClose(){String id = this.session.getId();if (id != null){webSocketSet.remove(id);log.info("【websocket】连接断开:总数:{}",webSocketSet.size());} } @OnMessage public void onMessage(String message){if (!message.equals("ping")){log.info("【wesocket】收到客户端发送的消息,message={}",message);sendMessage(message);} } /*** 发送消息* @param message* @return*/ public void sendMessage(String message){for (WebSocket webSocket : webSocketSet.values()) {webSocket.session.getAsyncRemote().sendText(message);}log.info("【wesocket】发送消息,message={}", message); }}- 客户端点
<div><input type="text" name="message" id="message"><button id="sendBtn">发送</button></div><div style="width:100px;height: 500px;" id="content"></div><script src="http://shimg.jingyanzongjie.com/230728/035I4F14-6.jpg"></script><script type="text/javascript">var ws = new WebSocket("ws://127.0.0.1:8080/message");ws.onopen = function(evt) {console.log("Connection open ...");};ws.onmessage = function(evt) {console.log( "Received Message: " + evt.data);var p = $("<p>"+evt.data+"</p>")$("#content").prepend(p);$("#message").val("");};ws.onclose = function(evt) {console.log("Connection closed.");};$("#sendBtn").click(function(){var aa = $("#message").val();ws.send(aa);})</script>服务端和客户端中的OnOpen、onclose、onmessage都是一一对应的 。- 服务启动后,客户端
经验总结扩展阅读
- 从0到1搭建redis6.0.7
- 京东云开发者|mysql基于binlake同步ES积压解决方案
- 关于ASP.NET Core WebSocket实现集群的思考
- 京东云开发者|IoT运维 - 如何部署一套高可用K8S集群
- 十六 企业级自定义表单引擎解决方案--Excel导入导出
- 一台虚拟机,基于docker搭建大数据HDP集群
- 5 why 分析法,一种用于归纳抽象出解决方案的好方法
- 【多服务场景化解决方案】AR虚拟技术助力智能家装
- 二 Istio:在Kubernetes(k8s)集群上安装部署istio1.14
- three.js webgl3D光伏,3D太阳能能源,3D智慧光伏、光伏发电、清洁能源三维可视化解决方案——第十六课